
Cell & Gene Therapy (CGT), mRNA-LNP & Controlled-Rate Freezer End-to-End Integration Guide
Document ID: SOP-CGT-LNP-GXPHISTORIAN-2026
Target Systems: Miltenyi CliniMACS Prodigy®, Cytiva Sefia™ S-2000 & Sepax™ C-Pro, Terumo BCT Quantum®, Precision NanoSystems (Cytiva) NanoAssemblr™ GMP System, and Planer Kryo 560 / Thermo Scientific™ CryoMed™ Controlled-Rate Freezers (CRFs)
Target Platform: GxPHistorian (edge-collector, postgres-control, clickhouse-archive, grafana-vision)
Regulatory Alignment: 21 CFR Part 11, EU GMP Annex 11, EU Guidelines on GMP for ATMPs (Part IV), FDA CMC Guidance for Human Gene Therapy & mRNA-LNP Products, ISPE GAMP 5 (Second Edition)
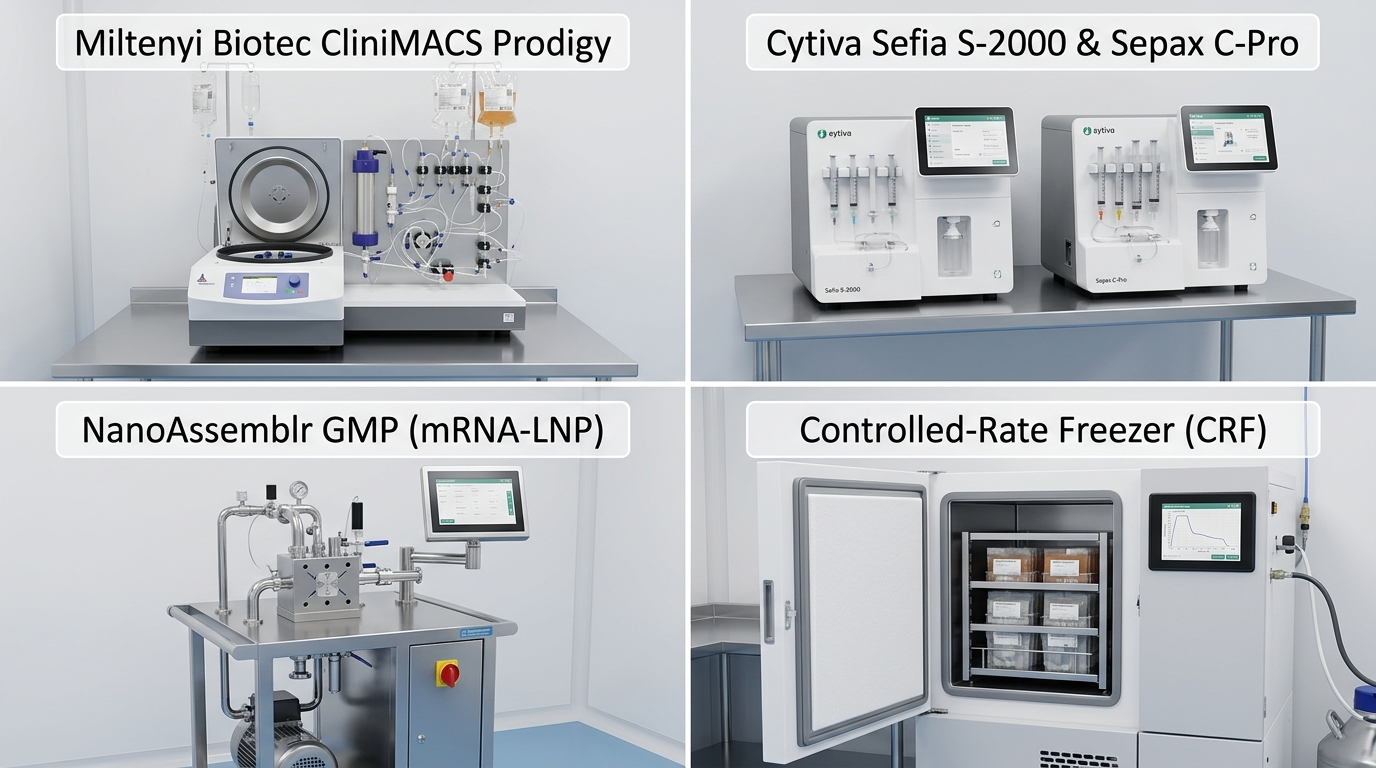
1. Visual Equipment & Physical Connection Overview
Cell and Gene Therapy (CAR-T, TCR-T, NK, Viral Vectors) and mRNA-Lipid Nanoparticle (LNP) manufacturing present unique historian requirements:
- Autologous “One-Batch-Equals-One-Patient” Vein-to-Vein Traceability: Every instrument run on a CliniMACS Prodigy, Sefia S-2000, or Controlled-Rate Freezer is tied to a single patient’s Chain of Identity (
COI_ID/DINDonation Identification Number). Losing telemetry or failing to link it to the patient’sCOI_IDcan delay life-saving release. - Closed-System Benchtop & Cart Skids: Unlike 2,000 L stainless bioreactors wired into plant-wide DCS cabinets, CGT instruments are compact benchtop or mobile cart units with rear RJ45 Ethernet or 9-pin DB9 RS-232 serial ports.
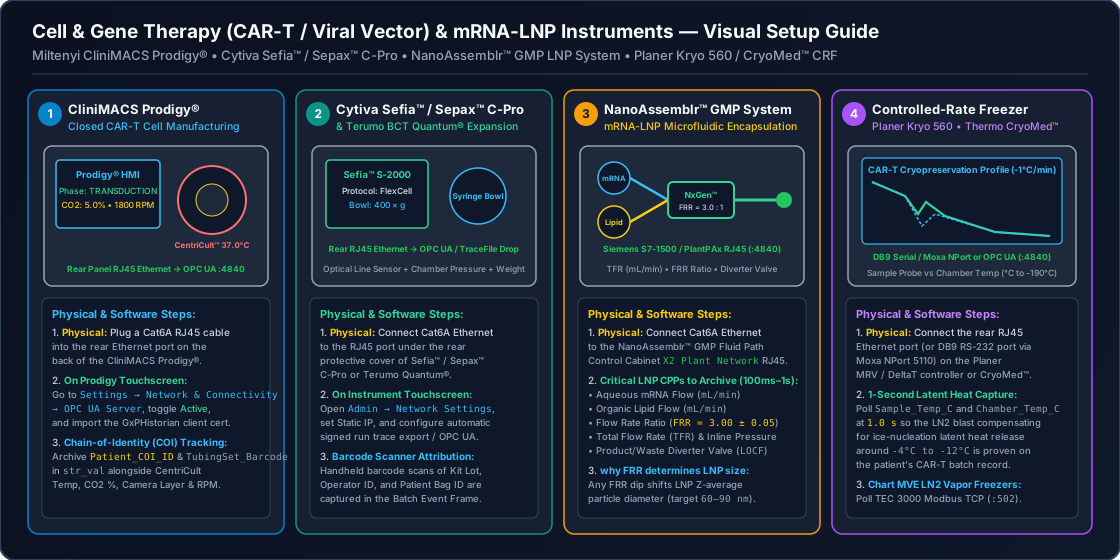
- Critical Thermal Inflection Curves (Latent Heat of Fusion): During cryopreservation in a Controlled-Rate Freezer, cells release latent heat as ice nucleates around to . QA must verify from the historian curve that liquid nitrogen () blast cooling compensated for the phase change without warming the patient bag.
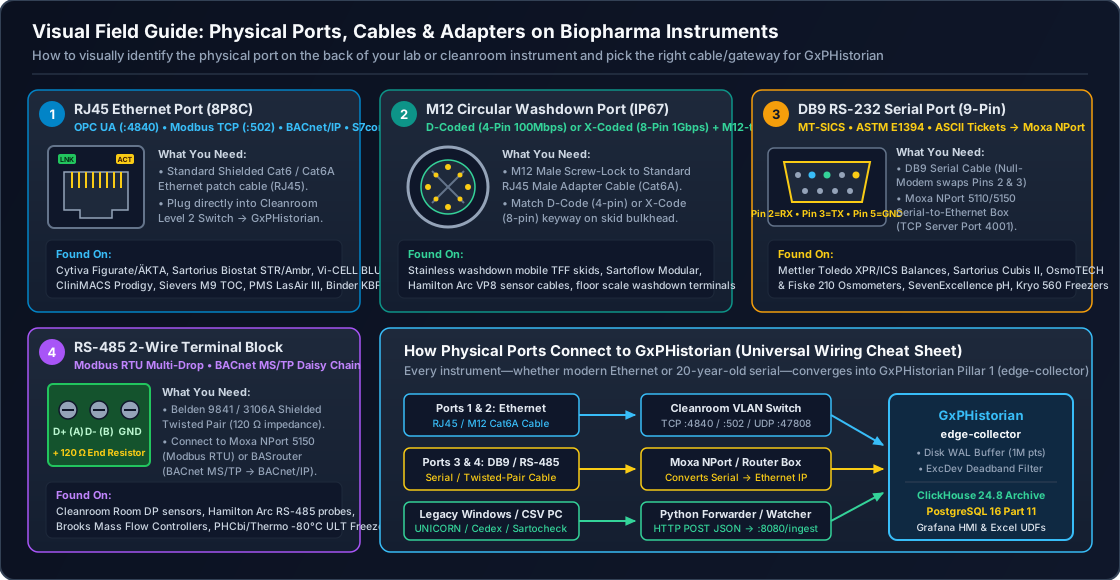
Also refer to our universal connector diagram if you are unfamiliar with industrial ports:
2. Quick-Reference: What Cable & Software Protocol Does My CGT / mRNA Instrument Use?
| Instrument Make & Model (Official Vendor Links) | Typical Process Step | Where to Plug In on the Physical Unit | Cable / Adapter Needed | Software Protocol & Port | Required Vendor License / Option |
|---|---|---|---|---|---|
| Miltenyi Biotec CliniMACS Prodigy® | Automated CAR-T cell washing, magnetic separation, transduction & expansion | Rear Panel — Lower Right Corner: Standard RJ45 Ethernet port next to the main power switch | Standard Cat6 Shielded Ethernet Cable into Facility GMP Switch | OPC UA Server (TCP 4840) OR Automated SMB/SFTP XML/PDF Run Export | CliniMACS Prodigy OPC UA License (Firmware ) or Network Share Export enabled |
| Cytiva Sefia™ S-2000 / Sefia Select™ | Closed-system apheresis cell isolation, washing, and final formulation | Rear Panel — Recessed I/O Bay: RJ45 Ethernet port (LAN) | Standard Cat6 Ethernet Cable | OPC UA Server (TCP 4840) via Chronicle™ or local skid OPC UA | Cytiva OPC UA / Chronicle Integration Option |
| Cytiva Sepax™ C-Pro | Cord blood & cell therapy volume reduction / bead washing | Rear Panel: RJ45 Ethernet port (Network) + USB-A ports | Standard Cat6 Ethernet Cable | Traceability Network Export (PDF/XML over SMB/CIFS to GxPHistorian UFL watch-folder) | Built-in Sepax Traceability network share configuration |
| Precision NanoSystems (Cytiva) NanoAssemblr™ GMP System | Microfluidic impingement jet mixing of mRNA (aqueous) + Lipids (ethanol) | Pump Skid PLC Cabinet (Siemens S7-1500 / Allen-Bradley): RJ45 Service / SCADA Port | Standard Cat6A Shielded Cable (M12 D-coded if washdown cart) | OPC UA Server (TCP 4840) at – high-speed polling | Included in NanoAssemblr GMP Automation Package |
| Planer Kryo 560-16 / Kryo 750 | Controlled-rate cryopreservation of CAR-T & leukapheresis bags | Rear of MRV Controller Head: 9-Pin DB9 Male RS-232 (Serial PC) or RJ45 Ethernet | Moxa NPort 5150 + DB9 Null-Modem adapter (or direct Cat6 to Planer DeltaT PC) | ASCII Serial over TCP (Port 4001) or CSV Run Export (ufl_file_collector.py) | Standard Serial Comms port (or Planer DeltaT software) |
| Thermo Scientific™ CryoMed™ (TSX / 7450 Series) | Controlled-rate freezer for cell therapy bags & vials | Rear Panel — Upper Comms Plate: RJ45 Ethernet / USB-B / RS-232 DB9 | Standard Cat6 Cable or FTDI USB-to-RS232 + Moxa NPort 5150 | OPC UA / Modbus TCP (Port 502) on touchscreen models; RS-232 ASCII on legacy 7450 | Standard on touchscreen CryoMed models |
3. Tutorial 1: Miltenyi Biotec CliniMACS Prodigy® (CAR-T Automated Cell Processing)
The Miltenyi CliniMACS Prodigy is the workhorse of autologous CAR-T manufacturing, performing cell washing, magnetic microbead enrichment (CentriCult chamber), viral transduction, and multi-day cell expansion (37.0 °C, 5.0 % CO2, gentle shaking) inside a single-use tubing set (TS 520 / TS 310).
3.1 Physical Connection Step-by-Step (For Lab Scientists & Operators)
- What to Bring to the Cleanroom:
- One Cat6 Shielded Ethernet patch cable ( wiped down with IPA / sporicidal wipes per your Grade B/C material transfer SOP).
- Locate the Physical Port:
- Walk behind the CliniMACS Prodigy benchtop unit (or roll the mobile Prodigy cart slightly forward).
- Look at the lower-right corner of the rear stainless panel, adjacent to the main AC power inlet and equipotential grounding stud.
- Locate the RJ45 Ethernet port (labeled with the network
🌐icon).
- Plug In:
- Insert one end of the Cat6 cable into the Prodigy’s rear RJ45 port until it clicks.
- Plug the other end into the cleanroom wall Ethernet jack patched to your GMP Instrument VLAN (e.g.,
10.20.70.0/24). - Verify the green Link LED on the RJ45 port lights up solid and the amber Activity LED blinks.
3.2 Software Enablement on the CliniMACS Prodigy Touchscreen
- On the CliniMACS Prodigy front touchscreen, log in with an Administrator or Supervisor account.
- Tap Settings (Gear Icon) Network Configuration.
- Select Static IP (never use DHCP without a permanent MAC reservation in a GMP facility) and enter:
- IP Address:
10.20.70.21 - Subnet Mask:
255.255.255.0 - Default Gateway:
10.20.70.1 - NTP Time Server: Point to your facility NTP server (same NTP source used by
GxPHistorianto satisfy 21 CFR Part 11 synchronized time).
- IP Address:
- Enable OPC UA (Recommended for Real-Time Telemetry):
- Navigate to Settings Interfaces / Connectivity OPC UA Server.
- Toggle Enable OPC UA Server to ON.
- Confirm Port:
4840. - Select Security Policy:
Basic256Sha256(Sign & Encrypt) and export/trust theGxPHistorianclient certificate (or selectNoneduring initial commissioning inside an isolated VLAN).
- Enable Automated Run Report Export (Backup / Dual-Path Verification):
- Navigate to Settings Data Export / Network Share.
- Configure the SMB path
\\10.20.70.10\gxphistorian_ufl\incoming\prodigy_01so that upon completion of every process protocol, the signed XML/CSV process log is automatically dropped intoGxPHistorian.
3.3 Verify Network Connectivity from the GxPHistorian Host
Run this single command from your GxPHistorian server terminal to confirm the Prodigy is reachable on Port 4840:
nc -zv 10.20.70.21 4840# Expected output: Connection to 10.20.70.21 4840 port [tcp/*] succeeded!3.4 Critical CliniMACS Prodigy Tags & Interpolation Rules
| Tag Name | Parameter Description | Engineering Units | is_step_tag | Why It Matters for ATMP Batch Release |
|---|---|---|---|---|
PRODIGY01_CHAMBER_TEMP_PV | CentriCult Chamber Temperature PV | degC | false (Linear) | Must hold during T-cell transduction & expansion |
PRODIGY01_CHAMBER_TEMP_SP | CentriCult Chamber Temperature Setpoint | degC | true (LOCF) | Step-change setpoint (4.0 °C labeling vs 37.0 °C expansion) |
PRODIGY01_CO2_CONC_PV | Gas Mix Concentration PV | % | false (Linear) | Maintains media pH buffering during multi-day expansion |
PRODIGY01_CENTRICULT_RPM | CentriCult Chamber Centrifugation / Shake Speed | RPM | false (Linear) | Verifies wash spin -force (0–2500 RPM) and gentle agitation |
PRODIGY01_PRESSURE_P1_MBAR | Tubing Set Line Pressure Sensor P1 | mbar | false (Linear) | Detects filter/tubing occlusion or bag overpressure |
PRODIGY01_PHASE_CODE | Active Activity Matrix Step ID | enum | true (LOCF) | Drives automatic ISA-88 Phase Event Frames (Wash, Feed, Harvest) |
4. Tutorial 2: Cytiva Sefia™ S-2000 & Sepax™ C-Pro (Cell Washing & Formulation)
The Cytiva Sefia S-2000 and Sepax C-Pro use a syringe-like rotating centrifugation chamber (CT-800.1 / CT-90.1 kits) and optical line sensors to separate plasma, wash DMSO/cryoprotectant, and concentrate CAR-T cells into final cryobags.
4.1 Physical Connection Step-by-Step
- Locate the Recessed I/O Panel:
- Look at the back of the Sefia S-2000 or Sepax C-Pro.
- Above the AC power socket is a recessed stainless connector bay containing an RJ45 Ethernet port (
LAN) and two USB-A ports (used for the handheld 2D barcode scanner that scans the patientCOI_IDand kit lot).
- Plug In:
- Plug a Cat6 Ethernet cable into the rear
LANRJ45 port and connect to your GMP Instrument switch (10.20.70.22).
- Plug a Cat6 Ethernet cable into the rear
4.2 Software Enablement (OPC UA or Traceability File Export)
- On Sefia S-2000 (with OPC UA / Chronicle Gateway):
- Log in as Administrator on the Sefia touchscreen.
- Go to Setup Connectivity Network and set Static IP
10.20.70.22. - Enable OPC UA Telemetry (
Port 4840) to stream chamber speed (RPM), piston position (mm), optical line sensor absorbance, and thermal mixer temperature (°C).
- On Sepax C-Pro (Automated XML/CSV Traceability Drop):
- Log in as Administrator Configuration Network & Export.
- Enter the SMB network share path of the
GxPHistorianwatch folder:\\10.20.70.10\gxphistorian_ufl\incoming\sepax_01. - Enable Auto-Export Traceability File at End of Procedure.
- When an operator scans the patient’s
COI_IDbarcode and completes aNeatCellorPeriCellprotocol, the Sepax C-Pro writes a structured XML/CSV file containing the time-series pressure/RPM trace, kit lot number, and patientCOI_ID, whichGxPHistorian’sufl_file_collector.pyparses into ClickHouse telemetry + an ISA-88 Event Frame within 2 seconds!
5. Tutorial 3: Precision NanoSystems (Cytiva) NanoAssemblr™ GMP System (mRNA-LNP Formulation)
In mRNA vaccine and gene editing (CRISPR LNP) production, the NanoAssemblr™ GMP System mixes an aqueous mRNA stream with an ethanolic lipid stream inside a NxGen™ microfluidic cartridge.
- Why 100 ms – 1 s High-Speed Historian Logging Is Mandatory: Particle size ( hydrodynamic diameter) and Polydispersity Index () depend entirely on maintaining a rock-steady Total Flow Rate (TFR) and Flow Rate Ratio (FRR, typically 3:1 Aqueous:Ethanol). Even a pressure pulsation during start-up or waste-to-collect valve diversion alters LNP encapsulation efficiency.
5.1 Physical Connection Step-by-Step
- Locate the NanoAssemblr GMP Automation Cabinet:
- The NanoAssemblr GMP system consists of the cleanroom Fluid Path Cart (holding the dual high-pressure syringe/gear pumps, flow meters, and NxGen mixer) connected to the Automation Control Unit (PLC cabinet).
- Open the PLC cabinet (or locate the bulkhead washdown connector on the side of the skid).
- Connect a Cat6A Shielded Ethernet cable (or M12 D-coded washdown Ethernet to RJ45 patch cord) into the Customer SCADA / Historian Port (
X2) on the onboard Siemens S7-1500 or Allen-Bradley CompactLogix PLC.
5.2 Software Enablement & High-Frequency Telegraf Polling
- Verify with your Cytiva commissioning engineer that the Customer OPC UA Server (
opc.tcp://10.20.70.25:4840) is active on the PLC’sX2interface. - Because LNP formulation runs are short () and fast, configure
GxPHistorianedge-collectorwith a500ms(0.5 s) polling interval:
# Added to edge-collector/telegraf.conf for NanoAssemblr GMP mRNA-LNP Skid[[inputs.opcua]]  name = "nanoassemblr_lnp_skid01"  endpoint = "opc.tcp://10.20.70.25:4840"  security_policy = "Basic256Sha256"  security_mode = "SignAndEncrypt"  certificate = "/etc/telegraf/certs/gxphistorian_client.pem"  private_key = "/etc/telegraf/certs/gxphistorian_client.key"  interval = "500ms"
  nodes = [    { name = "LNP01_AQUEOUS_FLOW_ML_MIN", namespace = "2", identifier_type = "s", identifier = "DB_HMI.Pumps.Aqueous_mRNA_Flow_PV" },    { name = "LNP01_LIPID_FLOW_ML_MIN",   namespace = "2", identifier_type = "s", identifier = "DB_HMI.Pumps.Ethanol_Lipid_Flow_PV" },    { name = "LNP01_TOTAL_FLOW_RATE_TFR", namespace = "2", identifier_type = "s", identifier = "DB_HMI.Process.Total_Flow_Rate_PV" },    { name = "LNP01_FLOW_RATE_RATIO_FRR", namespace = "2", identifier_type = "s", identifier = "DB_HMI.Process.Flow_Rate_Ratio_PV" },    { name = "LNP01_PRESSURE_AQUEOUS_BAR",namespace = "2", identifier_type = "s", identifier = "DB_HMI.Sensors.PT_Aqueous_Bar" },    { name = "LNP01_PRESSURE_LIPID_BAR",  namespace = "2", identifier_type = "s", identifier = "DB_HMI.Sensors.PT_Lipid_Bar" },    { name = "LNP01_COLLECT_VALVE_STATE", namespace = "2", identifier_type = "s", identifier = "DB_HMI.Valves.XV_Product_Collect_Open" }  ]
6. Tutorial 4: Planer Kryo 560-16 & Thermo CryoMed™ Controlled-Rate Freezers (CRFs)
Before CAR-T cells can be shipped in a vapor-phase dry shipper (Cryoport) back to the hospital, they must be frozen at a tightly controlled rate (typically down to , then down to ).
6.1 Physical Connection Step-by-Step (Non-Technical Guide)
- For Planer Kryo 560-16 / Kryo 750 (with MRV Controller Head):
- Look at the back of the MRV display controller head mounted on top of the freezer lid.
- Locate the 9-Pin DB9 RS-232 Serial Connector labeled
PC / Serial. - Plug a 9-pin DB9 serial cable + Null-Modem Adapter into Port 1 of a Moxa NPort 5150 Serial-to-Ethernet Device Server (
$130industrial box). - Plug a standard Cat6 Ethernet cable from the Moxa NPort 5150 into your cleanroom network jack (
10.20.70.28). - (Alternative if your Planer freezer already connects to a Windows PC running Planer DeltaT software): Install a second USB-to-Ethernet adapter on the DeltaT PC and point
GxPHistorian’sufl_file_collector.pyat the DeltaT CSV export folder.
- For Thermo Scientific™ CryoMed™ (Touchscreen Series):
- Locate the RJ45 Ethernet port on the upper rear communications panel.
- Plug a Cat6 Ethernet cable directly into your GMP Instrument VLAN (
10.20.70.29). - On the CryoMed touchscreen, go to Settings Communications Modbus TCP / OPC UA and enable external read access on Port
502/4840.
6.2 Capturing the Latent Heat of Fusion Dip (1-Second Polling)
- Why (
1s) polling matters: When the liquid inside the cryobag transitions to ice (around ), it releases latent heat. The Controlled-Rate Freezer triggers a rapid solenoid pulse plunging the Chamber Temperature (CRF01_CHAMBER_TEMP_C) down to for so that the Sample Probe Temperature (CRF01_SAMPLE_TEMP_C) inside the reference dummy bag continues cooling smoothly at . - By polling
CRF01_CHAMBER_TEMP_C,CRF01_SAMPLE_TEMP_C, andCRF01_PROFILE_SP_Cevery1sinto ClickHouse (is_step_tag = falsefor continuous temperatures), QA reviewers can overlay all three curves in Grafana or Excel DataLink to prove zero supercooling or post-nucleation thermal rebound occurred.
7. Registering CGT Assets, Patient COI_ID Event Frames & Verifying in GxPHistorian
Step 1: Register the CAR-T Suite Asset & Tags in GxPHistorian (with 21 CFR Part 11 Audit Headers)
Run the following curl commands (or paste into the FastAPI Swagger UI at http://localhost:8000/docs) to register the CliniMACS Prodigy and Controlled-Rate Freezer under your Cell Therapy Suite:
# 1. Create the CliniMACS Prodigy Asset in the ISA-95 Hierarchycurl -X POST "http://localhost:8000/api/v1/assets" \  -H "Content-Type: application/json" \  -H "X-Actor-Id: qa_lead@biopharma.com" \  -H "X-Change-Reason: IQ/OQ Commissioning of CAR-T Suite CliniMACS Prodigy 01" \  -d '{    "asset_code": "PRODIGY_01",    "asset_name": "Miltenyi CliniMACS Prodigy CAR-T Unit 01",    "parent_path": "enterprise.site_boston.area_cgt.line_cart_suite1"  }'
# 2. Register the Continuous & Setpoint Telemetry Tagscurl -X POST "http://localhost:8000/api/v1/tags" \  -H "Content-Type: application/json" \  -H "X-Actor-Id: automation_eng@biopharma.com" \  -H "X-Change-Reason: Bind CliniMACS Prodigy CentriCult and Controlled-Rate Freezer tags" \  -d '[    {"tag_name": "PRODIGY01_CHAMBER_TEMP_PV", "asset_code": "PRODIGY_01", "eng_units": "degC", "is_step_tag": false},    {"tag_name": "PRODIGY01_CHAMBER_TEMP_SP", "asset_code": "PRODIGY_01", "eng_units": "degC", "is_step_tag": true},    {"tag_name": "PRODIGY01_CO2_CONC_PV",     "asset_code": "PRODIGY_01", "eng_units": "%",    "is_step_tag": false},    {"tag_name": "PRODIGY01_CENTRICULT_RPM",  "asset_code": "PRODIGY_01", "eng_units": "RPM",  "is_step_tag": false},    {"tag_name": "CRF01_SAMPLE_TEMP_C",       "asset_code": "PRODIGY_01", "eng_units": "degC", "is_step_tag": false},    {"tag_name": "CRF01_CHAMBER_TEMP_C",      "asset_code": "PRODIGY_01", "eng_units": "degC", "is_step_tag": false}  ]'
Step 2: Open an Autologous Patient Batch Event Frame Linked to COI_ID
When the operator scans the patient’s apheresis bag barcode (COI-2026-88412-CAR), open an ISA-88 Event Frame in GxPHistorian:
curl -X POST "http://localhost:8000/api/v1/event-frames" \ -H "Content-Type: application/json" \ -H "X-Actor-Id: cell_therapy_operator_04@biopharma.com" \ -H "X-Change-Reason: Start CAR-T T-Cell Expansion Protocol for Patient COI-2026-88412-CAR" \ -d '{ "event_name": "CAR-T Expansion & Cryopreservation", "batch_id": "COI-2026-88412-CAR", "asset_code": "PRODIGY_01", "start_time": "2026-10-17T08:00:00Z", "attributes": { "patient_coi_id": "COI-2026-88412-CAR", "apheresis_din": "W411926008412", "tubing_set_lot": "TS520-2026-0991", "protocol_version": "T-Cell-Transduction-v3.4" } }'Step 3: Verify Patient Batch Summary in Excel DataLink
Once the run finishes, QA can open Microsoft Excel and pull the complete patient batch temperature and CQA summary using a single formula:
=GXPHISTORIAN_EVENT_SUMMARY("COI-2026-88412-CAR", "PRODIGY01_CHAMBER_TEMP_PV", "mean,min,max")8. Non-Technical Troubleshooting Checklist
| Symptom Seen by Operator / QA | Most Likely Physical or Software Cause | 2-Minute Fix |
|---|---|---|
| Green Link LED on rear of CliniMACS Prodigy or Sefia is OFF | Patch cable not fully seated in the recessed rear jack, or cleanroom wall port is not patched in the telecom closet. | Push the RJ45 connector until it clicks; test the wall jack with a laptop or move to the adjacent active cleanroom jack. |
nc -zv <IP> 4840 times out on Prodigy | Prodigy IP is set to DHCP (169.254.x.x self-assigned) or OPC UA toggle was not saved before rebooting the user interface. | On the Prodigy screen, check Settings Network to confirm the Static IP matches 10.20.70.21 and toggle OPC UA Server = ON. |
| Planer Kryo 560 connects on Port 4001, but zero temperature values appear | Pin 2 (RX) and Pin 3 (TX) are not crossed between the MRV DB9 port and the Moxa NPort 5150. | Insert a DB9 Null-Modem Adapter between the serial cable and the Moxa NPort Port 1; watch the orange Tx/Rx LED start blinking every second. |
| Sepax C-Pro says “Network Path Not Found” at end of run | The SMB shared folder on the historian server does not grant Write permission to the sepax_svc service account. | Verify the SMB share \\10.20.70.10\gxphistorian_ufl\incoming\sepax_01 allows Write/Create (while blocking Delete/Overwrite for Part 11 compliance). |